Checklist guideline for developing a cloud mining service; — “Cryptographic Mining as a Service: An IaaS based service delivery model”

CryptoMine: Cryptographic Mining as a Service.

By

Abdullah

I assume the reader of my article are familiar with terms digital currencies (such as bitcoins and litecoins), block mining, cryptographic hashes, and blockchain life cycle (optional).  This is my personal monograph on a product.

The cryptographic hash mining service in the classic cloud paradigm can be provisioned under the service delivery models of IaaS, and PaaS; for the SaaS model I don’t seems it fits here as the customer (tenants) will require full control over their mining procedure and the hardware they rented. As a cloud computing enthusiast I have compiled some quick checklist guidelines which should be kept in mind while developing such a product. These guidelines will help the readers in getting a glimpse of the envisioned business so that the interested reader can expand their R&D toward enumerating the  off-the-shelf technologies and software tools which can be utilized in building the product. Furthermore these guidelines can also be followed for developing any other sort of IaaS delivery model. The guidelines are listed below:

  • The IaaS is the lowest level in the cloud computing services stack and can be more monetarily beneficial as the popularity of digital currencies, and the technological trends exploited in modeling those currencies increases day by day.
  • However, providing mining infrastructure service is not an easy task and may requires a lot of investments. These investments will be covered up in the areas of technological equipments, manpower and operational expenses of the physical location where the equipments will be installed. This investment should have a return plan otherwise it is putting money in junk and the return planning should be done at every stage of the project in addition to proper marketing and coverage of the self service portal application across all range of devices even legacy devices also.
  • Whatever the case is, whether you are willing to buy ready made mining rigs (fastboot but costs more $$) or build your own customized rig yourself (a bit cheaper but takes a larger setup time and a small learning curve also), the development of self service portal is the most difficult task in the proposed/assumed system. This portal is the system’s interface where the user will interact with, and manage their rented mining infrastructure resources.
  • In addition to this, addressing the scaling up of the infrastructure as the degree of multi-tenancy in the underlying infrastructure increases by physically upgrading your hardware is also a tedious and monetary expensive task and can result in bankruptcy in case the business is fluctuating as the number of tenants consuming the service is fluctuating.
  • This issue can be resolved by using third party cloud services in case of peak workloads or fluctuating tenants degree. This provisioning of third party services should be transparent from the end tenants, they should see a unified view of the system. Third party provisioning may affect the QoS, in case the third party service is powered by conventional CPU instead of a GPU or an ASIC (application specific integrated circuit) . While utilizing GPU and ASICs based third party services may reduce the monetary benefits captured from individual tenants (customer) as you have to pay for those services. In some cases the benefit could go to zero or a negative if the margin is too low and the system managing services is consuming more money than the amortized margin gain for the individual customer.
  • Lastly, you still need some infrastructure on your home node. For the mining infrastructure you need some specialized mining hardware in order to keep your business running and more beneficial. For the management of the system (hardware and software both) i think it can be handled by conventional compute power, which should be as near as possible in terms of network parameters to the infrastructure it is managing. This separation of management platform from the core hardware which is traded bring a lot of benefits in terms of modularity and independence in case of hardware and software change management ( as the resource management and self service portal services are provisioned outside the hardware which is provided as service and being utilized by tenants).


  • Another perspective of the infrastructure is converging the computational power from the community/crowed by providing them monetary incentives. These crowd node will work as worker nodes to get a fair share for valid and fair mining task performed .  The  system management overhead in this case is more, as the general Internet traffic is fluctuating in nature. This integration of community can bring a lot of other opportunities in itself.


  • A Platform service can be provided over the above discussed IaaS layer. The platform services may mainly provide cryptographic hashing APIs and blockchain APIs for customized business application which can be disrupted by these technologies.


I hope i do not write junk….

A phone which should never brick

The concept is very simple the mobile device vendors should think about customers while designing a phone. Normally playing with phone system software sometime makes the phone useless (called brick). A phone  that would never brick should follow the principles of the configurable system setup just like in PCs and allow user to configure the boot sequence into different system areas like recovery,fastboot/odin, normal and external USB ( through OTG)  and in case a person overwrites his recovery partitions he can still boot by setting USB OTG as booting device and from here recovering his phone from dead to alive.

Further, from hardware point of view it should follow something like this https://en.wikipedia.org/wiki/Modular_smartphone

Boosting IoT research through effective research testbed setup

The internet of things (IoT) boom (as evident from google trends) is on its peak resulting in an abrupt attention from the research community toward formulating the IoT use cases and solving the problems in the IoT ecosystem.

iot-trends

Internet of Things search trend (courtesy: google)

In order to solve this problem, some researchers go beyond the formal and simulation methods to practically testing the behavior of their problem and its solution in a real or near to real test environments. These test environments are actually the pain in the ass designing, and configuring and deploying the heterogeneous IoT nodes with OS is a troublesome and lengthy process which often consumes a lot of precious time resulting in poor productivity. In order to solve this problem for the research community, I have a suggestion (both for novice and experts) and I have myself utilized it on certain occasions and I felt may be some peoples needing it.

Now, the solution is to utilize a plain standard Android phone (what do you think?).  I have very strong reasons for suggesting it and the reasons are:

  1.  The android phones are equipped with a facility known as USB on the go (OTG) for details google it. Now using this feature one can theoretically use any kind of device on the mobile device using the OTG  feature provided the mobile device has the appropriate drivers to handle the connecting devices common devices such as keyboard/mouse are I think plug-n-play due to the availability of drivers.
  2.  Now with custom design IoT nodes, there are two problems first the availability and deployment or porting of an OS to the designed IoT node is a difficult task and if the research use case is based on modeling a heterogeneous environment then the problem become threefold. The problem is further intensified when cross compiling drivers and the actual application for the nodes.
  3.  Now keeping in mind point 1 and point 2 let’s take a look at Android OS. Android OS is technically a Linux distribution (as far my knowledge says). So we have a Linux kernel beneath the Android applications life cycle. Now connecting the dots: with the OTG feature, we can connect any type of sensor to the Android device which is equipped with almost a full stack Linux kernel just needing to exploit the Linux kernel and make our IoT magic to work. Now the question arises why we are talking about the kernel why don’t we directly utilizes the Android OS and make our thing work the answer is simple. Android comes with a subset of standard C library called BIONIC custom designed for the resource scarce devices. Working with BIONIC and using the Android NDK also requires specialties and can take a lot of time. Academic researchers are normally equipped with the knowledge of standard C but not the peculiarities of porting and writing code for NDK and making it work on the standard Android ABI.
  4. So the solution is to get Linux environment on the mobile devices having direct access to the kernel and the resources she is managing (I mean no virtualization stuff). Now the question arises how can we get it? We can get it by utilizing the kernel of the Android in a chroot environment which enables us to utilizes a full stack Linux distribution with a more conventional C library and a very standard Linux application life cycle pattern which opens a range of application development for research purposes. Even you can get applications using apt-get and yum.
  5. This testbed concept can be applied to any of the research domain lying under the umbrella of mobile computing.


Feel free to update me upon my thinking…

Load Aware VM Placement in Open-stack Cloud: How To

In order to do a load-aware Virtual  Machine (VM) placement on real OpenStack testbed what thinks you need to do.

  1. Collect the CPU and memory utilization of each of the physical nodes using the procfs and delegate this information to the controller node.
  2. On the controller node store and update the load information of each physical node (which the physical node sent it).
  3. Using this historical load data, and the load criterion or any other multi-criterion, decide the reconfiguration of the VM placement matrix or placement of new VM request on the matrix.
  4. Repeat the process on intervals.

Performance difference of same program compiled differently on android, Why (I don’t know)

While playing around android, I was bench-marking my device using a simple 1000×1000 matrix multiplication program which is also listed below.

#include<stdio.h>
#include<stdlib.h>
#include<time.h>
int n=1000;
int main(){
int i,j,k,sum;
int no_of_bytes=n * n * sizeof(int);
int *A = (int *)malloc(no_of_bytes);
int *B = (int *)malloc(no_of_bytes);
int *C = (int *)malloc(no_of_bytes);
clock_t begin, end;
double time_spent;
srand(time(NULL));
for(i=0;i<n;i++){
for(j=0;j<n;j++){
*(C + i*n + j) = 0;
*(A + i*n + j) =(int)(rand()/500000);
*(B + i*n + j) =(int)(rand()/500000);
}
}
begin = clock();
for(i=0;i<n;i++){ //row of first matrix
for(j=0;j<n;j++){ //column of second matrix
sum=0;
for(k=0;k<n;k++)
sum=sum+( (*(A + i*n + j)) * (*(B + i*n + j)) );
(*(C + i*n + j))=sum;
}
}
end = clock();
time_spent = (double)(end - begin) / CLOCKS_PER_SEC;
printf ("Time taken to compute the matrix is %.2f\n", time_spent);
free(A);
free(B);
free(C);
return 0;
}

Now I compiled this program using two different methods.

Method 1: 

The program is added into the android source tree and compiled along with compilation of android from source code by  the android build process. Which generates a dynamically linked executable. This will off-course use the bionic c library. The output from the file command is something like this:

 ELF 32-bit LSB shared object, ARM, EABI5 version 1 (SYSV), dynamically linked (uses shared libs), stripped 


Method 2: 

In this compilation method, the program is compiled using “arm-linux-gnueabi-gcc” with a -static flag generating a statically linked executable. The static linking was performed because “arm-linux-gnueabi-gcc” would normally use the glibc, which is not available in android.  The output from the file command is something like this:

ELF 32-bit LSB  executable, ARM, EABI5 version 1 (SYSV), statically linked, for GNU/Linux 2.6.32, BuildID[sha1]=b3f88119c36f1ddb318eb0fbe8ade60a792b1562, not stripped


Result: 

Now when I executed both these programs on a same device (GT-i9100g), I got a substantial difference and I don’t know why. If any body have any clue please mention it in the comments.

Execution Time
Method 1 0.03  seconds
Method 2 38.56 seconds


How-to Write a Kernel Module for Android

In this article I will describe how you can write a kernel module for Android or its after market product like CyanogenMod. As we all know Android is based upon and using the GNU/Linux kernel. Therefore, writing/building kernel modules for android is same as writing/building a kernel module for the common Linux found on our desktop or server machines. However, if you ever try to build kernel module for android using the guidelines written for the desktop Linux machine you could possibly not be able do build it. According to my knowledge and experience, the reason behind that possible module build failure is the integrated build environment of Android Open Source Project (AOSP).  In order to write and build a kernel module for android you need to first download the android source. In this tutorial I am using CyanogenMod 11 but you can use also the android source from the AOSP. Moreover, I am using the AOSP android emulator for demonstrating this tutorial. However, I have tested this exact method on CyanogenMod 10 on a Samsung Galaxy S-II i9100G. So my guess is it would work for any device. Also if you are using your phone for this experiment please backup everything and don’t blame me if you phone is bricked. Before starting make sure you have all the prerequisite libraries on your system please see the AOSP or CyanogenMod website for this.

Step 1:

Download the AOSP or CyanogenMod Source (If you already have a downloaded source leave this step).


$ mkdir cm11
$ cd cm11
$ repo init -u git://github.com/CyanogenMod/android.git -b cm-11.0
$ repo sync

It would take a couple of hours to download and maybe more if you are behind a low bandwidth. Also if you are using emulator for this experiment do not download cm-10.x as it is not downloading the Goldfish kernel 2.6.xxxx source (I don’t why but it happens to me, maybe it is exception i.e. special case).

Step 2:

Once you have  source downloaded you have to breakfast or lunch;so that, the kernel sources for your device are downloaded. Also please check your device specific build guides in case you are using CyanogenMod in order to retrieve pre-builts and proprietary blobs.


$ . build/envsetup.sh
$ lunch

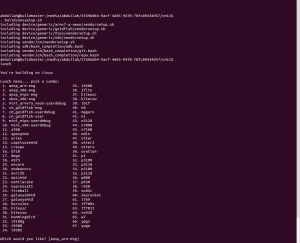
The lunch command will list the devices for which CyanogenMod can be built as shown in the image below:
Kernel-Build-1-Screenshot - 07312015 - 07_47_29 PM

As I am building for the emulator, I have selected the option 6, which is the cm_goldfish-eng. Instead of the lunch command, you can also use the breakfast command which takes the device code (these device codes can be found here) name as a parameter. So in our case it would be:


$ breakfast cm_goldfish-eng

After the lunch or breakfast command (whichever you have used) it take a couple of minutes to download the kernel sources for your device in our example it will download the Goldfish Kernel (3.4.xxx).

Step 3:

Once the kernel source is downloaded, than we are good to go write and build our first kernel module. In order to write your module follow the following steps:

a) First goto the kernel source directory. For our example it is in kernel/goldfish/ directory. From the AOSP/CyanogenMod so:

$ cd kernel/goldfish

b) Once you are in the kernel source folder. We will create a directory for our module in the drivers directory of the kernel source. So technically we are building a driver which will print hello world on kernel message buffer. In order to do so go to the drivers directory and create a directory for your module.

$ cd drivers
$ mkdir helloworld
$ cd helloworld

c) Now here create/write your module files. For the example I have created a hello.c file with the following contents:


#include <linux/init.h>
#include <linux/module.h>
MODULE_LICENSE("GPL");
MODULE_AUTHOR("Abdullah Yousafzai, 2015");
MODULE_DESCRIPTION("Hello World Kernel Module for Android");

static int hello_init(void)
{
    printk("Hello Kernel World....\n");
	return 0;
}
static void hello_exit(void)
{
    printk("Goodbye Kernel World\n");
}
module_init(hello_init);
module_exit(hello_exit);

d) Now create the KBuild system Kconfig file in the module directory. I have created the Kconfig file with the following contents for this example.


config HELLO_MOD
	tristate "Hello World Module"
	default m
	depends on MODULES
	help
	  This module will write Hello Kernel World to the Kernel Message Buffer

e) Once this is done now create the module Makefile. I have created the Makefile with the following contents:


ifneq ($(KERNELRELEASE),)
# call from kernel build system
obj-m	:= hello.o
endif

Now our module is written but now in the coming steps we have to change certain configuration files in order to make that module available in the Android ROM/Emulator you are building.

Step 4:

Once the module is written with all the basic necessary source file, Kconfig and Makefile. We have to add refrence to these two files in the main drivers Kconfig and Makefile. In order to do so go to the drivers directory and open the Kconfig and Makefile in the editor of your choice and follow the following steps.

a) After opening the drivers/Kconfig add the following statement in the end of the file before the endmenu line. This shown in the picture also.

source "drivers/helloworld/Kconfig"


b) Once the drivers/Kconfig is edited. Open the drivers/Makefile and add the following line in the end of the file.

obj-$(CONFIG_HELLO_MOD) += helloworld/

At this stage we are almost done with the configuration for the module. But now we have to reconfirm that Modules loading and unloading are enabled in the kernel config file.

Step 5:

In order to check this, goto the kernel source parent directory (in our example case kernel/goldfish) and than navigate to the "arch" directory and than from there navigate to the architecture for which you are building android. As most of the Android based smartphones are ARM based so most of the times you have to go into the arm directory unless you are building Android for some other architectures listed in the arch directory. As for our example we are using the android emulator which is emulating the ARM instruction set so, I have navigated to the "arm" directory and than from here to the "configs" directory.

Once you are in the “configs” directory you must have to know the config file which is being used by the Android/CyanogenMod build system to build your kernel. In our example case it is using the file "cyanogenmod_goldfish_armv7_defconfig". First backup this file to avoid mishaps. Than open this file with the editor of your choice and do the following changes in it.

a) Find the string CONFIG_MODULES. If it is found and shows like this :

# CONFIG_MODULES is not set

b) than, remove this line and add the following lines at the end of the file


CONFIG_MODULES=y
CONFIG_MODULE_FORCE_LOAD=y
CONFIG_MODULE_UNLOAD=y
CONFIG_MODULE_FORCE_UNLOAD=y

c) Note, If by searching CONFIG_MODULES does not find any thing than also add the above snippet at the end of the file.

Step 6:

Now at this stage we have do all the necessary setting in order to get our module working. Now it is time to build the android for your device/emulator. If you are using a real device you can either do an otapackage build or a normal build. As I am using emulator so I do not need the otapackage. I will go for the standard make build. Go to the Android source parent directory. If your shell session has been closed you have todo again the . build/envsetup.sh followed by the breakfast or lunch commands, otherwise you can simply write make in terminal from you Android/CyanogenMod source root. So, for me:

$ make -j4 
Or
$ make -j4 otapackage (if you are using a real device and want everything zipped so it can be used by the recovery to flash the zip on your device)

It would take tens of minutes to do the build if everything is smooth and fine. Once the build finishes now you can flash the zip on your device. As we are using emulator for our example, we need to do one step more because the emulator, normally uses a prebuilt kernel which most of the time is compiled with the CONFIG_MODULES=n. So the prebuilt kernel cannot load our modules and we have to change the prebuilt kernel image with the one which we have just compiled.
Step 7: This step only implies if you are using emulator. To replace the prebulit emulator kernel first backup the prebuilt emulator. The prebuilt emulator kernel file is "prebuilts/qemu-kernel/arm/kernel-qemu-armv7". Backup this  "kernel-qemu-armv7" file and than replace the "prebuilts/qemu-kernel/arm/kernel-qemu-armv7" image with the newly compiled kernel  image which is found at copy the "out/target/product/generic/kernel" . Now, once kernel is replaced from the Android/CyanogenMod source parent directory write the following command.

$ emulator-arm 

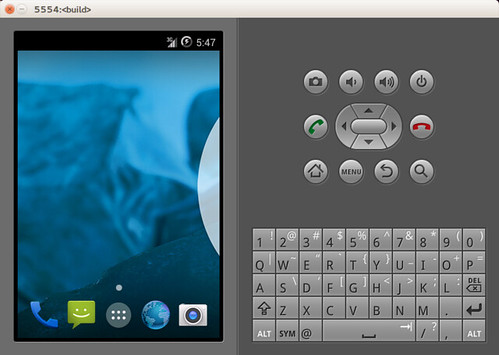
This will open the android emulator. wait for it to load properly. For me it show like this:

Step 7:

Once the emulator is up and running, it is time to test our module. So, open another shell terminal and and do the following:

$ adb shell

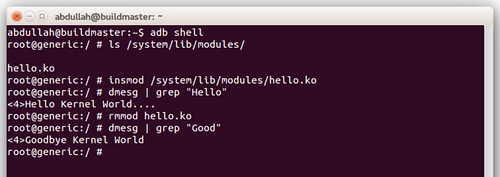
this will open the device shell and will looks like:

Now the module we have built can be found in the device "system/lib/modules" directory it is clear from the screenshot also. Now, we have to insert that module using "insmod" and than have to check the kernel message buffer whether the message is printed or not. you can remove the module using "rmmod". Now from the device shell insert the module using the following command, the output of the module is also listed in the above screenshot:


# insmod /system/lib/modules/hello.ko
# dmesg | grep "Hello"
Hello Kernel World....
# rmmod hello.ko
# dmesg | grep "Good"
Goodbye Kernel World

I hope you will enjoy this tutorial. Please make comments if you did not understand something i will try to clear it.


Tech Industry Violating Consumer Rights

The advancement in computer technologies has bring revolution in our day to day lifestyle, However, these technologies has a very serious implications and violates the basic consumer rights. Before going to the discussion I will share an example of a piece of furniture. If anybody buy a wooden table he can change that table into a chair by disassembling,cutting and adding some wooden components to shape it into a chair. But as far as electronics devices this is not the case and I strongly feel that it is a violation of Human Rights as when I buy an electronic device such as a smartphone, It means I have paid for all the technology that devices contains including the hardware and software. But as I perceive the vendors thinks they did not sale it instead they rented it out to customer and the customer is bound to the regulations.

This phenomenon is obvious from the fact the schematics of the devices are not available at all which make it difficult for researchers and enthusiast to hack the device and find some other interesting uses cases for it. Further the worst thing is the devices are even boot locked. You cannot compile another operating system for the device. For example in case of iPhone (i would call it iStone as it is too much bounded ) consumer is forced to use only iOS (even I think for jailbreaked one also * I am not sure). For android based devices they are also boot locked and you have to root it (which I thinks voids the warranty) vendor has some proprietary (sucking) binaries and you can not change easily to a kernel of your own choice. I want that every smartphone should be allowed to boot any available OS for mobile and embedded systems.

Deploying COMET on Samsung Galaxy S-II (GT-I9100G)

COMET is an application level VM Synchronization solution developed my Mark Gordon and is freely available and hosted on GitHub. As COMET is articulated in 2012 so the direction given by Mark Gordon was correct according to that time and still is with minor changes as I followed Gordon’s direction and I am unable to set it-up working. So I played a little and figured out, how it can be configured. I am sharing the details of changes I did  here, may be I am too direct here and you still need to first check Gordon’s Comet Page and than do these steps if you cannot configure it with Gordon’s directions.

First you need to setup the repo for Android JB using the command:

repo init -u https://github.com/msg555/comet_android -b jellybean

once the repo setup is done than you have to filter out a source code project causing some copyright conflict and removed from the CyanogenMod tree. For that purpose a line in the repo manifest should be removed. So you have to edit the repo default/main manifest xml file. You can use any editor But i used gedit the command looks like this:

gedit source-code-repo-root/.repo/manifests/default.xml

the line that should be removed is for more details see here :

<project path="external/svox" name="CyanogenMod/android_external_svox" />

Once you removed this line than you can sync your repo and will go normally but still it would take time depending upon you internet speed.

Once the source code is successfully downloaded..

than you have to setup the build environment using :

. build/envsetup.sh

or

source build/envsetup.sh

once the build environment is configured, than you have to execute the following command

breakfast i9100g

i9100g was my device name replace this with your device name you can find you device name on the CyanogenMod website.

once that is done now you have to get the prebuilts.

cd vendor/cm
./get-prebuilts

or

vendor/cm/get-prebuilts

once you get the prebuilts. The next step is to get the proprietary blobs.

According to Gordon’s direction you should do this:

./extract-files.sh

But In my case ./extract-files.sh is not working and if in your case it shows the message like  “No such file or directory”. In that case you should try the following:

cd device/samsung/i9100g/
./proprietary-files.sh

or

device/samsung/i9100g/proprietary-files.sh

Well note that here you have also to change two things as my device manufacturer is Samsung so you have to change samsung in the above commands to your device  manufacturer name. Likewise, i9100g is my device name you have to change this to your device name.

Well In mobile cloud computing computational offloading is used to take the advantage of the resourceful desktop or cloud machine and run the program faster in order to investigate this the only open source (to my knowledge) solution which exist is comet developed by Mark Gordon how ever if you want to try comet on your device there are certain things which you should do in order to get it working. I would not write all the steps as it can be seen on the CyanogenMod wiki and comet page but I will write those things which are not listed on those pages and will make problems in setting up.

If ./extract-files.sh is not working on your environment and shows the message like  “No such file or directory”. In that case you should try the following

cd device/samsung/i9100g/
./proprietary-files.sh

or

device/samsung/i9100g/proprietary-files.sh

After this step you are ready to build using:

make -j10 otapackage

Now for Building COMET follow the instructions on the COMET page under the heading of “Building COMET”. Once you have build the comet than you have to build some other comet packages i.e.:

make -j4 tcpmux
make -j4 CometSettings

Than push the vm on the phone using the Gordon’s Instructions.

also to run the server you should run the tcpmux deamon from this directory.

source-code-repo-root/out/target/product/i9100g/system/bin

note that you have to change the device name to your device name.

I hope this will be helpful…